이전 포스팅에서는 PlayerInput 컴포넌트를 통해 키 입력을 받는 작업까지 마쳤습니다.
이번 포스팅에서는 PlayerController 컴포넌트를 통해 PlayerInput 컴포넌트에서 받은 값으로 캐릭터를 움직여보겠습니다.
PlayerController 전체 코드입니다.
using System.Collections;
using System.Collections.Generic;
using UnityEngine;

public class PlayerController : MonoBehaviour
{
    private PlayerInput playerInput;
    private Rigidbody2D playerRigidBody;
    public Collider2D footCollider;
    public float moveSpeed;
    public float jumpForce;
    bool island = true;
    // Start is called before the first frame update
    void Start()
    {
        playerInput = GetComponent<PlayerInput>();
        playerRigidBody = GetComponent<Rigidbody2D>();
    }

    private void FixedUpdate()
    {
        Move();
        Jump();

    }
    private void Move()
    {

        playerRigidBody.AddForce(Vector2.right * playerInput.move * moveSpeed,ForceMode2D.Force);
        if (playerInput.move == 0)
        {
            GetComponent<Animator>().SetBool("IsMove", false);
        }
        else if (playerInput.move < 0) {
            GetComponent<Animator>().SetBool("IsMove", true);
            GetComponent<SpriteRenderer>().flipX = true;
        }
        else if (playerInput.move > 0)
        {
            GetComponent<Animator>().SetBool("IsMove", true);
            GetComponent<SpriteRenderer>().flipX = false;
        }
    }
    private void Jump()
    {
        if (playerInput.jump && island)
        {
            playerRigidBody.AddForce(Vector2.up * jumpForce, ForceMode2D.Impulse);
            island = false;
            GetComponent<Animator>().SetBool("OnAir", !island);

        }

           if (playerRigidBody.velocity.y > 0)
           {
               GetComponent<Animator>().SetBool("IsUp", true);
               footCollider.enabled = false;
           }
           else if (playerRigidBody.velocity.y < 0)
           {
               GetComponent<Animator>().SetBool("IsUp", false);
               footCollider.enabled = true;

           }
    }

    private void OnCollisionStay2D(Collision2D collision)
    {
        island = true;
        GetComponent<Animator>().SetBool("OnAir", !island);
    }
    private void OnCollisionEnter2D(Collision2D collision)
    {
        island = true;
        GetComponent<Animator>().SetTrigger("Land");
    }
    private void OnCollisionExit2D(Collision2D collision)
    {
        island = false;
        GetComponent<Animator>().SetBool("OnAir", !island);
    }
}

캐릭터에 추가한 후, 인스펙터 창에서 설정한 값입니다.
코드를 나눠서 설명하겠습니다.
 private PlayerInput playerInput;
 private Rigidbody2D playerRigidBody;
 public Collider2D footCollider;
 public float moveSpeed;
 public float jumpForce;
 bool island = true;
playerInput - 키 입력을 담당하는 컴포넌트
playerRigidBody - 물리를 담당하는 컴포넌트
footCollider - 충돌을 담당하는 컴포넌트(캐릭터의 발 쪽에 위치함)
moveSpeed - 이동속도
jumpForce - 점프할 때 가해지는 힘
island - 캐릭터가 땅 위에 있는지 판별
void Start()
    {
        playerInput = GetComponent<PlayerInput>();
        playerRigidBody = GetComponent<Rigidbody2D>();
    }
Start() 메서드는 해당 컴포넌트가 처음 활성화 될때 자동으로 실행됩니다.
따라서 특정 변수들의 초기화(Initialize)할 때 주로 Start 메서드 안에서 합니다.
GetComponent<>는 Unity 컴포넌트를 프로그래밍 할때 가장 많이 사용하는 메서드 중 하나입니다.
GetComponent<>는 게임 오브젝트에 추가되어있는 컴포넌트를 가져올때 주로 사용합니다.
player에 추가되어있는 PlayerInput과 Rigidbody2D를 PlayerController에서 사용하기 위해 GetComponent<>를 사용하였습니다.
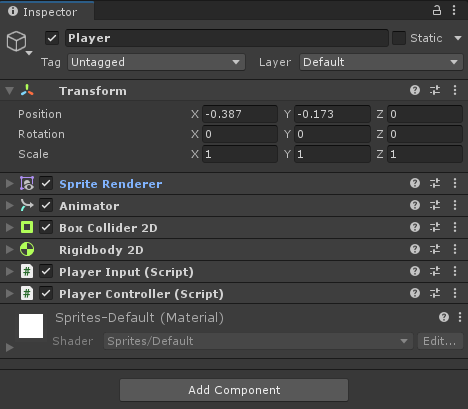
위의 그림에서와 같이 같은 게임 오브젝트 내에있으면 GetComponent<>를 통해 가져올 수 있습니다.
다음 링크는 GetComponent<>에 관한 자세한 링크입니다
docs.unity3d.com/kr/530/ScriptReference/GameObject.GetComponent.html
Unity - 스크립팅 API: GameObject.GetComponent
성능적인 이유때문에 string 대신, Type에 대한 GetComponent 를 사용하는 것이 좋습니다. 때때로 Javascript에서 C# 스크립트에 액세스하려고 하면 타입으로 구성 요소를 검색하지 못할 수 있습니다. 이
docs.unity3d.com
    private void FixedUpdate()
    {
        Move();
        Jump();

    }
이번에는 FixedUpdate()입니다.
FixedUpdate()는 Update()와는 다르게 정해진 시간에 따라 주기적으로 호출되는 메서드입니다.
앞으로 설명할 Move(), Jump()와 같이 캐릭터의 이동에 관련된 메서드들을 Update()에서 호출한다면 컴퓨터 성능에 따라서 결과가 달라지기 때문에 FixedUpdate()에서 호출해 줍니다.
    private void Move()
    {
        playerRigidBody.AddForce(Vector2.right * playerInput.move * moveSpeed,ForceMode2D.Force);
        if (playerInput.move == 0)
        {
            GetComponent<Animator>().SetBool("IsMove", false);
        }
        else if (playerInput.move < 0) {
            GetComponent<Animator>().SetBool("IsMove", true);
            GetComponent<SpriteRenderer>().flipX = true;
        }
        else if (playerInput.move > 0)
        {
            GetComponent<Animator>().SetBool("IsMove", true);
            GetComponent<SpriteRenderer>().flipX = false;
        }
    }
이번에는 Move()입니다. 이름에서 보시면 알겠지만, 캐릭터의 이동을 담당해줄 메서드입니다.
RigidBody2D.AddFoce를 사용했습니다. AddForce 즉 힘을 더한다는 뜻입니다.
매개변수로 Vector2(2차원 벡터), 힘의 타입(모드)를 받는 메서드입니다.
x축이동을 할 것이기 때문에 Vector2.right(1,0)에 playerInput.move(playerInput을 통해 받는 힘의 방향)을 곱해주고, moveSpeed(이동속도)를 곱해주어 캐릭터에 가해질 힘을 정했습니다.
그 다음 ForceMode2D.Force 이 모드는 지속적으로 주어지는 힘에 어울리는 모드입니다.
움직임에 사용되는 힘은 지속적으로 주어지므로 이 모드를 사용했습니다.
        if (playerInput.move == 0)
        {
            GetComponent<Animator>().SetBool("IsMove", false);
        }
        else if (playerInput.move < 0) {
            GetComponent<Animator>().SetBool("IsMove", true);
            GetComponent<SpriteRenderer>().flipX = true;
        }
        else if (playerInput.move > 0)
        {
            GetComponent<Animator>().SetBool("IsMove", true);
            GetComponent<SpriteRenderer>().flipX = false;
그리고 중요한 부분입니다!
여기서는 키입력에 의해 playerInput.move에 값이 바뀌는 것을 보고, 캐릭터의 애니메이션 변화를 줄 것입니다.
move == 0 : 키입력이 없을 때
move < 0 : 왼쪽 방향 키 눌림
move >0 : 오른쪽 방향 키 눌림
GetComponent<Animator>().SetBool로 상태머신에서 정한 파라미터를 설정해 줄수 있습니다!!!

move의 값이 변하고, 위의 조건문에서 호출한 GetComponent<Animator>().SetBool를 통해서 Idle 과 Run 사이의 Transition 조건이 변화하여 애니메이션이 전환 됩니다!!!
그리고 GetComponent<SpriteRenderer>().flipX 이 부분은
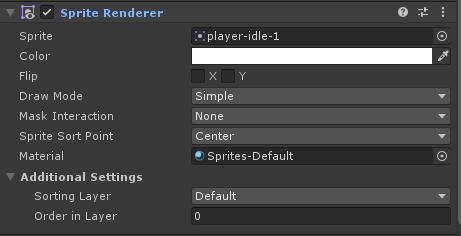
SpriteRenderer 안의 Flip을 바꾸어주는 코드입니다.
X, Y축으로 이미지를 뒤집어주는 효과를 얻을 수 있습니다.
현재 캐릭터 이미지를 좌,우로 뒤집어 바라보는 방향과 이동하는 방향을 일치시켜줍니다.
여기까지 따라 오셨다면, 이제 캐릭터를 좌우로 움직이는데 성공하셨습니다!!!
지금부터는 점프와 관련된 내용입니다.
    private void Jump()
    {
        if (playerInput.jump && island)
        {
            playerRigidBody.AddForce(Vector2.up * jumpForce, ForceMode2D.Impulse);
            island = false;
            GetComponent<Animator>().SetBool("OnAir", !island);

        }

           if (playerRigidBody.velocity.y > 0)
           {
               GetComponent<Animator>().SetBool("IsUp", true);
               footCollider.enabled = false;
           }
           else if (playerRigidBody.velocity.y < 0)
           {
               GetComponent<Animator>().SetBool("IsUp", false);
               footCollider.enabled = true;

           }
    }
playerInput.jump = true 인경우는 스페이스바가 눌린 경우입니다. 그리고 island는 땅에 닿아있는지 확인하는 변수입니다.
스페이스바가 캐릭터가 땅에 닿아있을때 눌리면 점프를 할수있도록 힘이 가해집니다.
여기서 점프에 주는 힘의 모드는 ForceMode2D.Impulse로 이 모드는 충돌, 폭발 같은 한 순간에 주어지는 힘에 어울리는 모드입니다.
그 이후 Animator에 OnAir 변수를 True로 만들어주고, 다음 if문에서 Y축 힘의 방향을 판별합니다.
점프인지, 추락인지 판별하여 Animator의 IsUP 변수를 지정하고, 추락할때만 캐릭터의 Collider를 활성화 시킵니다.
    private void OnCollisionStay2D(Collision2D collision)
    {
        island = true;
        GetComponent<Animator>().SetBool("OnAir", !island);
    }
    private void OnCollisionEnter2D(Collision2D collision)
    {
        island = true;
        GetComponent<Animator>().SetTrigger("Land");
    }
    private void OnCollisionExit2D(Collision2D collision)
    {
        island = false;
        GetComponent<Animator>().SetBool("OnAir", !island);
    }
이 부분은 Collision 메서드들입니다.
GameObject가 Collider를 가지고 있으면 자동으로 호출되는 메서드 들입니다.
OnCollisionStay2D - Collider가 다른 충돌 오브젝트와 지속적으로 충돌 중인 경우 / 땅위에 있을 경우
OnCollisionEnter2D - Collider에 다른 충돌 오브젝트가 충돌한 경우 / 착지한 경우
OnCollisionExit2D - 다른 Collider와 충돌이 끝난 경우 / 점프한 경우
점프 했을 때, 착지 했을때를 가정하며 Collsion메서드들을 이용하여 Animator의 변수들을 지정했습니다!!
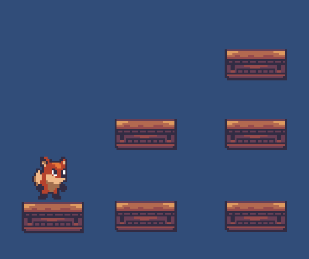
자신이 원하는데로 발판을 만들어보고 어떻게 동작하는지 확인해보세요!
'유니티(Unity) > 2D 게임 만들기' 카테고리의 다른 글
| 2D 게임 만들기 (7) Collider, Tag를 이용한 점수 내기 (0) | 2021.06.08 |
|---|---|
| 2D 게임 만들기 (6) 점수 시스템(Canvas) (0) | 2021.05.27 |
| 2D 게임 만들기 (4) 캐릭터를 움직이기 위한 준비, 키 입력 받기 (0) | 2021.05.10 |
| 2D 게임 만들기 (3) 유한 상태 머신, 전이(Transition) 설정 (0) | 2021.05.01 |
| 2D 게임 만들기 (2) Animator, 유한 상태 머신 사용하기 (0) | 2021.04.29 |